
TL;DR
- A rollator bell attachment helps you alert people politely without raising your voice.
- Start with a strap-mounted bell for the easiest fit on most rollators.
- Mount it near your thumb and never block the brake lever.
- Test: ring once, brake once, and fold your rollator (if it folds) before going out.
If you’ve ever been cruising with your rollator on a busy sidewalk and felt awkward saying “excuse me” over and over… you’re not alone. A rollator bell attachment is one of those tiny add-ons that can make outings feel smoother, safer, and way less stressful—for you and for the people around you.
What is a rollator bell attachment?
A rollator bell attachment is a small, usually bicycle-style bell that clamps or straps onto your rollator handle so you can alert pedestrians with one hand—without raising your voice or letting go of your brakes.
Quick safety note: A bell is for gentle alerts, not “speed mode.” If you ever feel unstable in crowds, prioritize the brakes first.
Who benefits most from a rollator bell?
A bell isn’t “must-have” for everyone, but it can be a game-changer if:
- You walk in crowded areas (malls, parks, promenades, markets)
- Your voice is softer, you get winded, or you don’t want to shout
- You’re a caregiver and want a simple way to signal politely
- You use your rollator indoors (assisted living corridors, rehab centers)
- You have arthritis and need a one-touch alert (no fiddly buttons)
Bell vs horn vs light + horn: what should you pick?
Not all “alert” accessories are equal. Here’s how to choose without overthinking it.
A standard bell (most people should start here)
Best for: sidewalks, indoor halls, slow-paced environments
Pros: simple, reliable, no batteries, polite tone
Watch out for: tiny thumb levers if you have arthritis
A horn (only if you truly need more volume)
Best for: louder outdoor areas or if people often don’t hear a bell
Pros: louder, more noticeable
Watch out for: can startle people indoors; some are awkward to mount
A light + horn combo (visibility + alert)
Best for: early mornings, evenings, winter, or dim indoor spaces
Pros: adds visibility; can be safer in crossings
Watch out for: batteries/charging + bulkier mounting
Rule of thumb: If you’re unsure, start with a bell. Upgrade to a horn/light only if you’re consistently not being noticed.
Compatibility checklist (don’t skip this)
Most returns happen because of fit issues. Before you buy, check these:
1) Handlebar / grip thickness
- Measure the handle area where you’ll mount it (or estimate).
- Strap-mounted bells fit more rollators because they’re flexible.
- Clamp-mounted bells need the right diameter and can pinch soft grips.
2) Brake lever clearance
Make sure the bell won’t:
- bump your brake lever,
- block your hand position,
- or force your wrist into an awkward angle.
3) Folding clearance
Many rollators fold inward. Avoid mounting anything that:
- sticks out too far,
- hits the frame,
- or prevents the rollator from locking safely.
4) Left-hand vs right-hand use
If one hand is stronger/more comfortable:
- Mount it on the side you can tap easily,
- while still keeping your “steady hand” ready for the brake.
What to look for in a senior-friendly rollator bell
These features matter way more than “brand.”
Arthritis-friendly trigger
Look for:
- large thumb pad
- light press
- short travel (no stiff spring)
Loud enough, not obnoxious
A “polite ping” is perfect for most situations. If you’re outdoors a lot, go slightly louder—but avoid anything that sounds like a scooter horn in a hospital hallway.
Secure mounting that won’t slide
- Strap systems should have a grippy underside.
- Clamp systems should tighten securely without crushing foam grips.
Weather resistance (if you go outside a lot)
Rain happens. Basic bells survive light moisture, but if you’re outdoors daily, prioritize sturdier materials.
Quick comparison: types of rollator bell attachments
Use this to choose fast:
| Type | Best for | Pros | Cons | Affiliate slot |
|---|---|---|---|---|
| Strap-mounted bell | Most rollators | Fits almost anything; easy install | Can rotate if strap is weak | [Best strap bell – affiliate link] |
| Clamp bell (bike-style) | Firm handle surfaces | Very stable; crisp sound | Fit issues; may pinch foam grips | [Best clamp bell – affiliate link] |
| Thumb bell (large lever) | Arthritis / weak grip | Easy press; minimal force | Sometimes less “pingy” | [Arthritis-friendly bell – affiliate link] |
| Horn / light+horn | Loud outdoor areas, low light | More noticeable; adds visibility | Batteries; bulkier; can startle | [Light + horn combo – affiliate link] |
Best placements: where should you mount it?
Most people get the best results mounting the bell:
- Near the inside edge of the handle (easy thumb reach)
- Slightly forward (so your hand doesn’t bump it)
- On your stronger side (especially if you have arthritis)
Avoid: mounting it where your palm rests, on the brake lever housing, or anywhere that changes your natural grip.
How to install a rollator bell attachment (step-by-step)
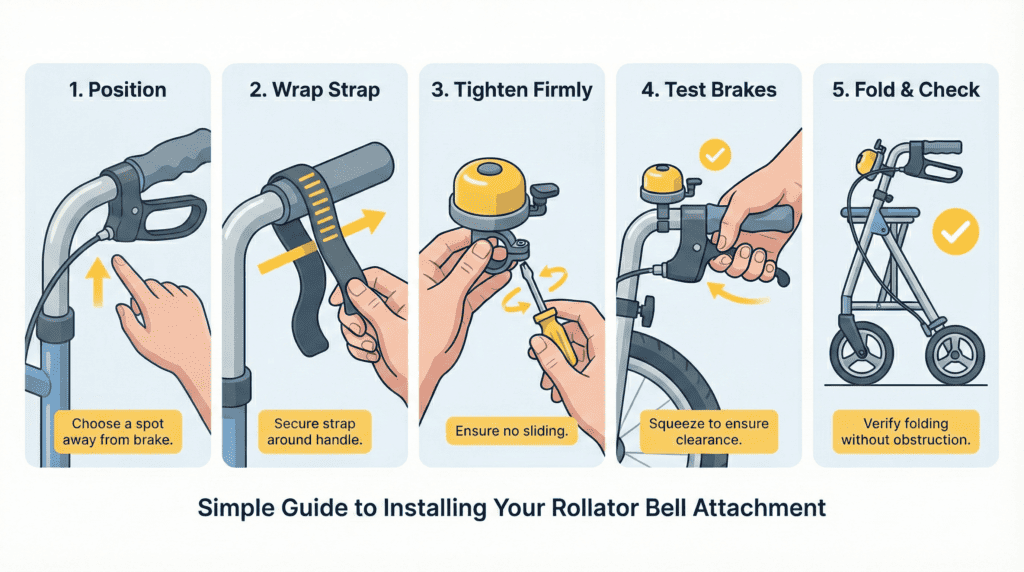
This takes about 5 minutes.
If you have a strap-mounted bell
- Pick the position: near your thumb, not touching the brake lever.
- Wrap the strap around the handle.
- Tighten firmly so it doesn’t slide when you press it.
- Test the brakes: squeeze and release fully.
- Fold your rollator (if it folds) to ensure nothing jams.
If you have a clamp-mounted bell
- Check fit: the clamp should match the handle thickness.
- Open the clamp and place it on the handle.
- Tighten gradually (don’t crush foam grips).
- Align the trigger so your thumb reaches it naturally.
- Test brakes + folding again.
✅ Your final test: Walk 10 steps, ring once, brake once. If your grip feels “off,” reposition.
How to use it politely (and actually get results)
A bell works best as a gentle heads-up—not a “move!” command.
Try this rhythm:
- Ring once (soft alert)
- Pause a second
- If needed, ring once more
- Then follow with a calm “excuse me” if you’re close
In indoor settings (clinics, assisted living), keep it extra light—some folks are sensitive to sudden sounds.
Troubleshooting (quick fixes)
Bell keeps rotating/sliding:
- Move it to a less tapered area of the grip
- Tighten more, or switch to a strap with better grip
It blocks the brake lever:
- Slide it 1–2 cm inward/outward
- Rotate the bell body so the trigger sits lower
Too hard to press with arthritis:
- Switch to a large-thumb trigger style
- Mount closer to where your thumb naturally rests
The sound is weak:
- Some bells just “thud” on soft grips—try mounting on a firmer section
- Consider a better-quality bell (stronger spring + cleaner striker)
FAQ
Can I put a bicycle bell on a rollator?
Yes. Most rollator bells are bicycle-style bells. Just confirm the mount fits your handle thickness and doesn’t interfere with the brakes.
Where should I mount a rollator bell attachment?
Mount it near your thumb on your stronger side, positioned so your hand stays comfortable and the brake lever moves freely.
What’s better: a bell or a horn for a rollator?
A bell is usually best for polite alerts and indoor hallways. A horn can be useful outdoors in noisy areas, but it may startle people indoors.
Is a rollator bell safe if I have balance issues?
It can be safe if it’s mounted where you can press it without reaching or shifting your grip. Always prioritize brake control and move slowly in crowds.
What if my rollator has soft foam grips?
Strap mounts usually work best on soft grips. If you use a clamp, tighten gently—over-tightening can damage foam and cause slipping.
Why does my bell keep sliding or rotating?
Move it to a less tapered section of the handle, tighten the strap/clamp, or choose a mount with better grip so it stays aligned.
Final takeaway
A rollator bell attachment is one of the simplest upgrades you can make: inexpensive, easy to install, and genuinely helpful in crowded spaces. If you want the lowest-risk choice, go strap-mounted and place it where your thumb naturally lands—then test brakes and folding before you head out.
Related (internal links):